Gardevoir / Jellicent


Tier 1
•
Decklist
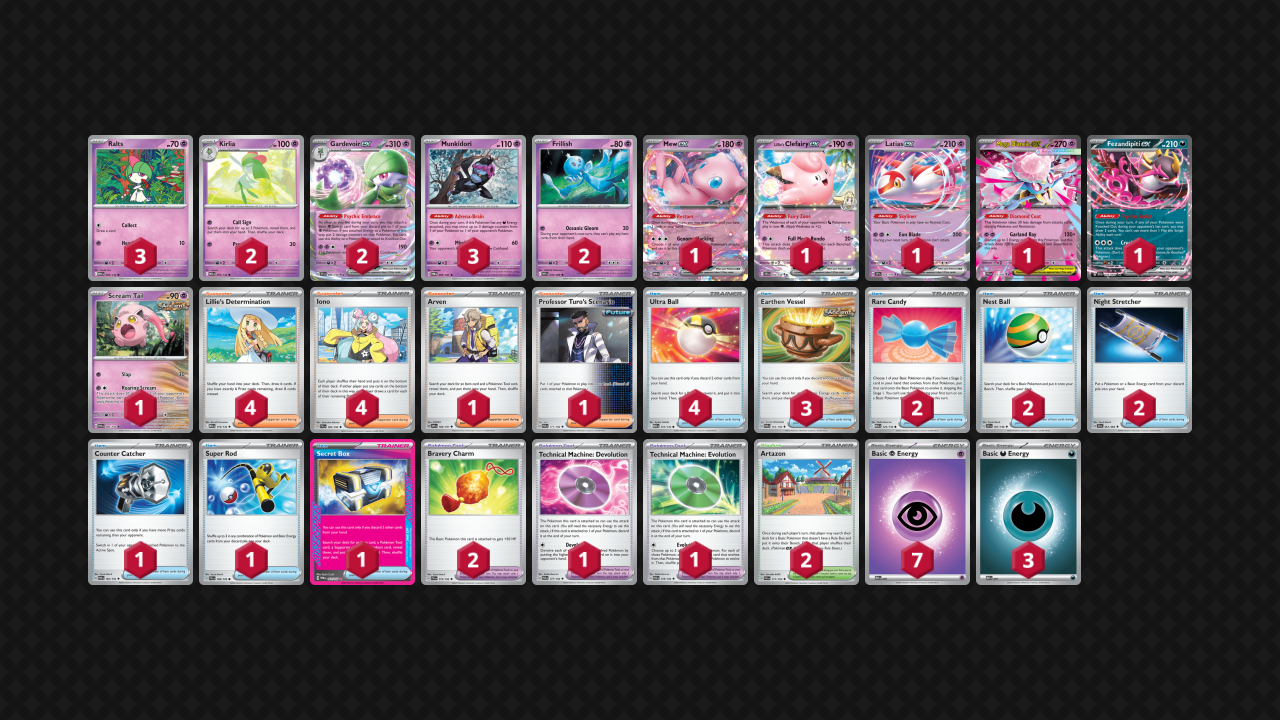
- I decided to cut Jellicent for now, but since most lists have it, the matchup notes still include notes for Jellicent. Jellicent is mostly relevant in the mirror. It's also good against Charizard on the Devo turn, and against Dragapult for the non-Evo build. I wasn't using it very much but it could go back in. It's more important to have in the non-Evo build. Also, the Charizard and mirror matchups are compensated for in other ways.
- I prefer the Evo build with two Kirlia because it makes a huge difference in the Dragapult matchup. Evo'ing is also generally better in slower matchups, and Jellicent isn't that important overall.
- Double Frillish is too important against Gholdengo. It's also important to not prize it in some matchups and situations.
- I tried without the Latias, but getting a consistent Turn 1 Frillish is crucial against Charizard, Absol, and mirror.
- Double Charm is extremely strong against Gholdengo and Absol.
- Even without Jellicent, Devo is still nearly just as good. It's particularly important against Charizard, Gholdengo, and Grimmsnarl.
- Turo gets used a decent amount. Mostly against decks with retreat lock, which aren't as popular now. It's also good for board fixing, though hard to find at the right time. Finally, it's better with Latias because that's a liability that can be removed, and also because Latias makes Energy get stuck, which Turo can unstick.
- I'm pretty sure second Artazon is better than Mystery Garden, though they do different things so it's weird to compare them. Artazon helps set up and stabilize, and also makes the Turn 1 Frillish a lot more likely. Mystery Garden is more situational and not very good in the early-game. I did not use it that much when I had it, and never missed it when playing without it.
- This deck does not need two Counter Catcher! Most games you either don't need any, or just the one, and basically never need two.
- Cuttable cards are Frillish, Turo, Bravery Charm, and maybe Latias. I wouldn't cut anything else.
To try: Drifloon
Gameplay
- Going for Turn 1 Latias plus Frillish is generally worth it when the opponent did not have a strong Turn 1 and you can cut off their options. For example, if Gholdengo or Absol did not get their key Pokemon into play, Frillish can cripple them. If they did, Frillish isn't as necessary on Turn 1. Against decks like Charizard and Gardevoir that rely on Items to set up, you basically always want a Turn 1 Frillish.
- Jellicent is sometimes bait because it can be Bossed around or KO'd by Dark-types. However, if there is no incoming punish, it can be a very strong option for applying early pressure.
- Utilizing manual Energy attachments can save games where you don't get Gardevoir as fast as you want, particularly attaching to Diancie, Munkidori, or Clefairy can be helpful.
- Sometimes you need to leave damage in play and/or preload Pokemon with Energy if the opponent is capable of KO'ing Gardevoir. Many games are won by accurately preparing for worst-case scenarios and thinking ahead.
- In general, try to keep multi-prize Basics away from the board in the early-game. They are usually ok to put down later, especially if you have a winning prize trade mapped out and need to stay on tempo. The main exception is an early Fezandipiti if the opponent is applying fast pressure. Another exception is if you can get a fast manual Diancie with no better options.
- Go second against everything besides Fan Rotom decks and Ceruledge.
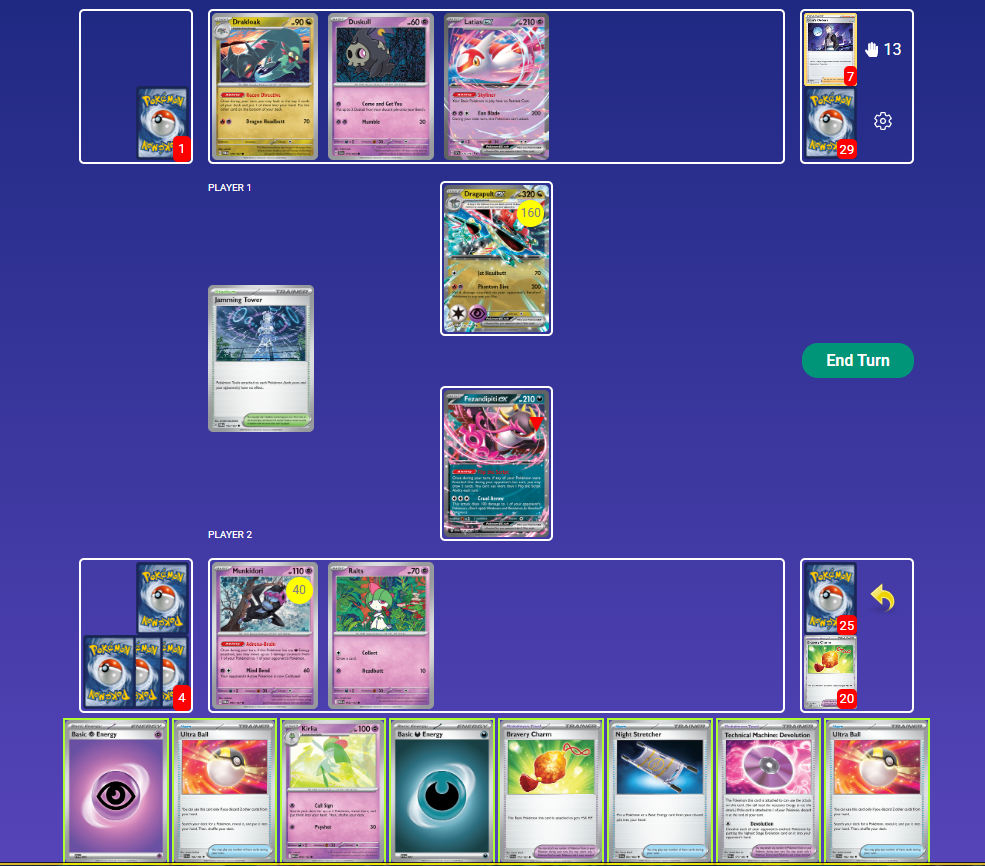
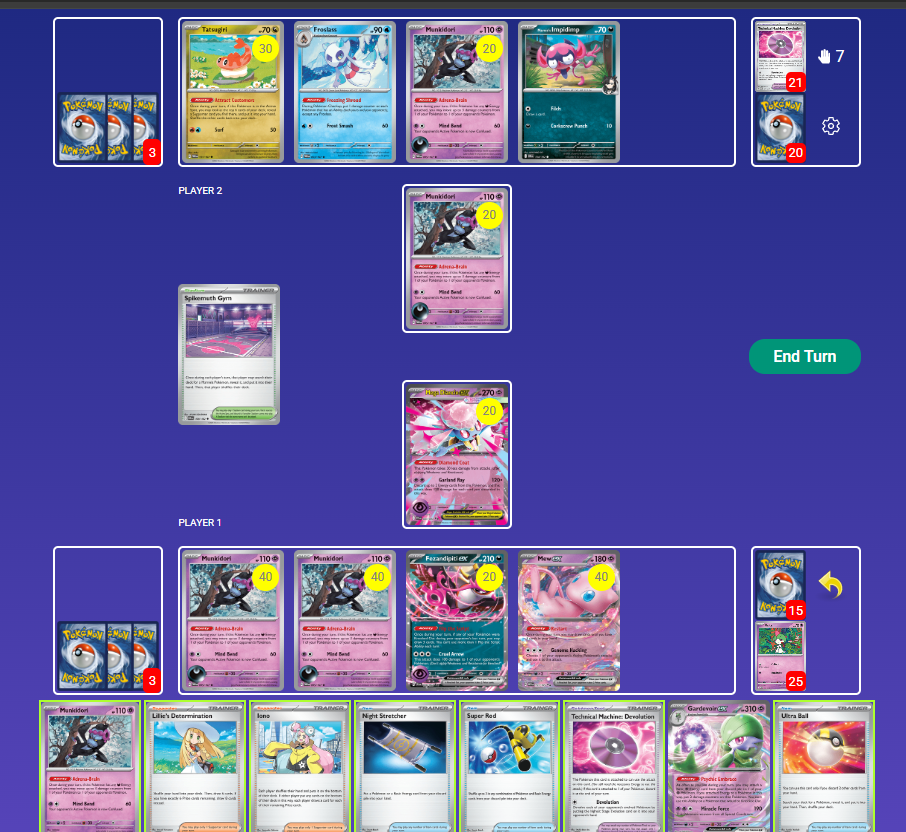
This scenario is interesting because the game is most likely doomed, but there's still some decisions to be made to maximize the chance of salvaging the game. We can empty our hand and use Mew's Restart off Ultra Ball, so the questions are where to attach the Energy and if we should evolve into Kirlia. Worth noting is that there's only one Stadium out left in the deck, as a Stadium and Secret Box are already gone.
Attaching to Fez opens the copium Candy Garde or Stadium Devo lines. Attaching to Munkidori stops immediate death to Hawlucha, but still loses to Dusclops or Boss (one of each are already in their discard). Either way, we'll most likely need Iono off of this Mew since the opponent has 13 cards in hand. Evolving to Kirlia is also needed to avoid death to Hawlucha, but closes off the Candy Garde line. Since I thought the offensive lines were so unlikely, I opted to play the entire hand down, evolving to Kirlia and attaching to Munki. Restart for 3 hoping for Iono, but whiffed and Adrenabrain to Duskull. I believe there were either three or four Iono left in deck. If there were only one or two, going for an offensive line would probably be more likely to hit.
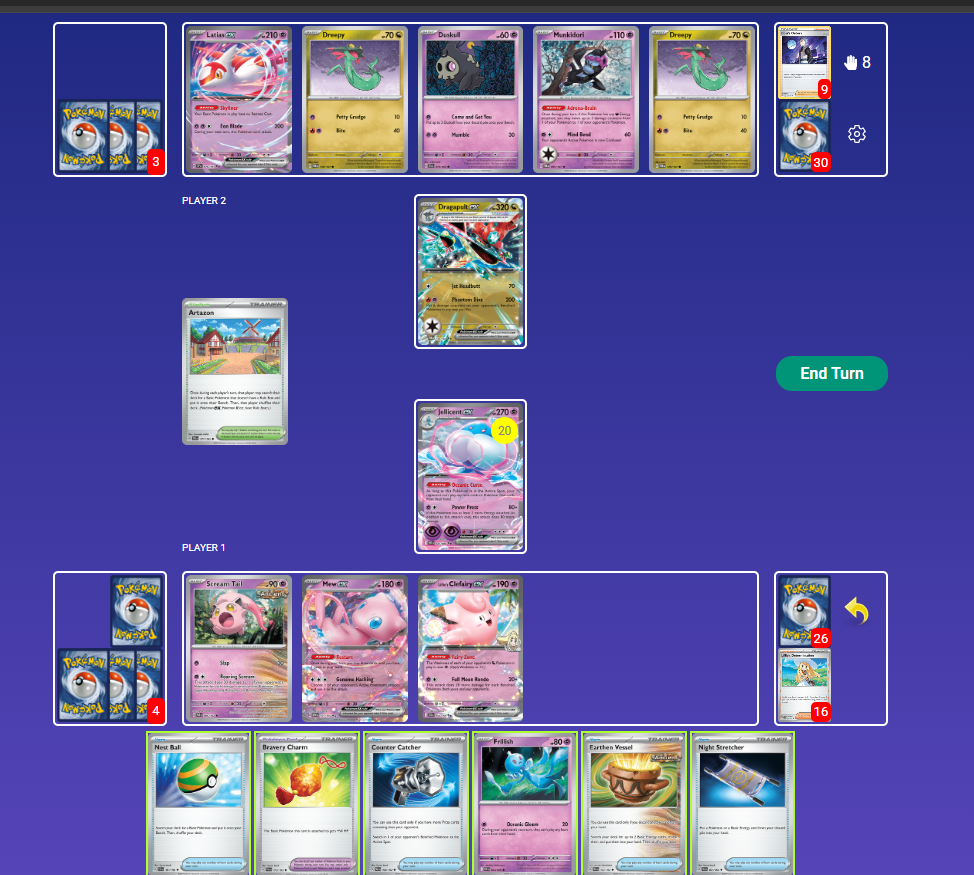
Here we have a spot that looks dire but is actually not terrible. Their Dragapult has Neo Upper and their Munkidori has Luminous, which means we'll need a Munkidori of our own in order to two-shot their Dragapult with Jellicent. Both Ralts are in the discard, so we may be tempted to Stretcher for one and Charm it, but that is feeding it to Jamming Tower plus Adrenabrain. They have eight cards in hand, but thanks to Jellicent, we know their hand isn't very good, as they would have evolved into Stage 1s if they had any. There's a good chance that they won't be able to progress next turn, so we can see what happens, and play the Ralts when it's safer after taking out the Pult.
We could grab Fez and draw three, but we need space for Munkidori and Ralts next turn. Artazon for Munkidori in case of Jamming Tower, and smack for 160. Vessel for Dark and attaching it now is feeding it to Dusclops unnecessarily, so we save that. Charm can go onto Scream Tail to stop that free prize from Adrenabrain plus Phantom Dive. Hold the rest of the hand.
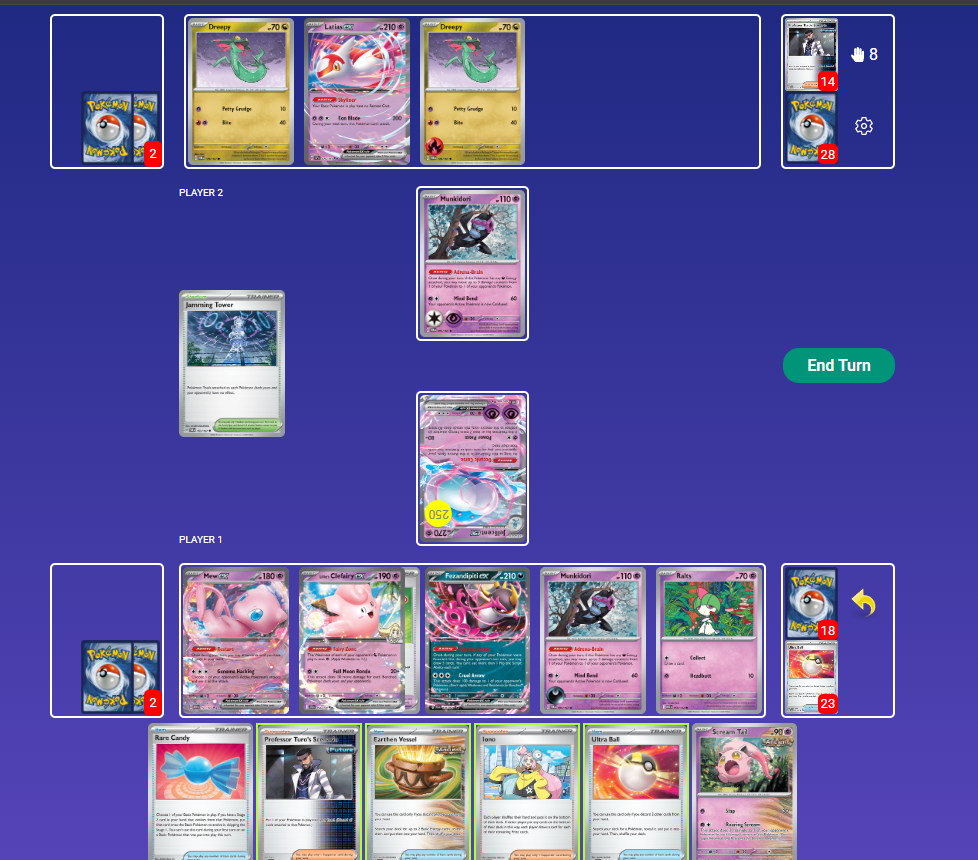
Continuing from the last position, we did get the two-shot on their Dragapult as well as the Ralts recovery. They did have Jamming Tower to get our Scream Tail (which was apparently recovered in the interim), but thanks to Jellicent's Item lock, they had no choice but to Mind Bend for the turn, and now we can Candy Garde. With plenty of options, we have to identify the correct end result and sequence appropriately. Our only Pokemon that isn't at risk of Ursaluna is Gardevoir, so we should attack with that.
Vessel away Scream Tail for two Psychic, Ultra Ball away a Psychic and Turo for Garde, and use Candy. Manually attach to Jellicent to retreat, so that Adrenabrain gets it out of range of Dreepy's Bite. Adrenabrain to their active so they can't recover Munki and KO Gardevoir with Adrenabrain plus Ursaluna. Play Iono on their 8-card hand now that we're releasing the Item lock, draw one with Mew, load up Gardevoir, retreat, and KO. If they get it, they get it.
Most people's first inclination here would probably be to get Ralts, maybe use Iono, and attack with manual Munkidori. That was my first thought too, but we do not need Gardevoir for the rest of this game. In fact, that bench spot is better off used for the third Munkidori. We can use Stretcher for Dark and triple Adrenabrain to KO and spawntrap their Impidimp, ensuring that no Grimmsnarl comes into play to close out this game. This completely forgoes an attack for the turn. Even though we could attack with Diancie or Munkidori, KO'ing the Impidimp is just better. Leaving the Diancie in the Active leaves it at risk of Ursaluna, so retreating it and using Iono minimizes the risk. There's also the chance of drawing Bravery Charm to make it completely safe.
Matchups
Dragapult / Dusknoir - Slightly Unfavorable (for the list with no TM: Evo and 2-1-2 Gardevoir), Very Favorable (with TM: Evo and 3-2-2 Gardevoir)
- Early Frillish into attacking Jellicent is generally good. If they ignore the Jellicent and wipe out the Ralts, use Clefairy's Ability to make Jellicent two-shot their Dragapult.
- Sometimes you won't be able to get Gardevoir out for awhile. Try to manually power up relevant attackers such as Jellicent, Munkidori, or Clefairy. You'll eventually need Gardevoir at some point, so try to find openings to put down double Ralts.
- Using Devo after hitting into their Dragapult once can also be a strong play, depending on the situation. It takes one fewer prize card than KO'ing the Dragapult, but makes it difficult or impossible for them to attack on the next turn, which can allow for Gardevoir to be set up.
- Setting up a Gardevoir is usually a win. If you're playing the build with TM: Evo, prioritize that over early Item lock.
- Scream Tail's first attack can apply fast pressure by KO'ing their Budew. This is situational but can sometimes be the best play. If they whiff a follow up Budew/Phantom Dive, Gardevoir can be set up.
- If you have Gardevoir set up, look for a big play with Mew ex Phantom Dive plus Clefairy.
- Clefairy is generally more useful in the early-game, because in the late-game, it can easily be return-KO'd by Ursaluna. If they choose to target it down, that takes some heat away from Ralts/Kirlia.
Gholdengo - Favorable
- Oftentimes only need one Gardevoir. Don't evolve into the second Gardevoir unnecessarily because they won't disrupt your hand. Try to avoid having things in play that Solrock can KO, especially when Item locking. Bravery Charm or delaying Ralts can be good for this.
- Every turn consider the board state and see if you can pivot into a prize trade. If you can put together a winning prize map, there isn't much they can do about it.
- Ideal board is Gardevoir, Frillish, two Munkidori (extremely important), and then whatever else. Second Frillish is good when they are stalled out and not attacking, but not always necessary. Second Ralts/Kirlia is often good in the early-game! And then a leftover spot for Fez which is often needed, or a random attacker for prize trading.
- If you cannot start prize trading, just keep attacking with Frillish and set up for a Devo play.
- Devo play is very strong but not the main plan, it just sometimes works out that way and is a reliable comeback option.
- Attacking with an early Gardevoir can be strong as it sets up for Frillish gameplan. However, if you do not have the proper follow-up ready, attacking with Gardevoir might be too risky/premature.
- In general, Frillish is your main/default attacker.
- Do not use Jellicent at all in the early- or mid-game. It is best used with the Devo play, but doesn't always matter.
- If they are ahead in prizes and threatening a Mawile attack to escape Frillish lock, try to hit CC Iono Mew on their Mawile for 260. Make sure you do not damage the Mawile before hitting it with Mew, and just hope they don't get Turo. This is pretty situational.
- Charm almost always gets slammed on Frillish.
Gardevoir Mirror - Even (maybe Slightly Unfavorable without Jellicent)
- Get Turn 1 Frillish. Fast attacking Jellicent is extremely strong. The non-Evo build has the Jellicent advantage while the Evo build has a better chance of setting up Gardevoir under Item lock.
- If you don't have Gardevoir, try to respond to Jellicent with manual Mind Bend. Manual Diancie plus Adrenabrain does KO, but that is very situational. In any case, getting Darks on Munkidori is a high priority.
- When Gardevoir is set up, KO'ing their Munkidori with Darks via Scream Tail is usually a good play. KO'ing their Jellicent is also good whenever possible.
- Charm is usually best on Scream Tail to prevent Adrenabrain from KO'ing it. Charm can also be good to protect two-prize Pokemon such as Fezandipiti or Latias if they happen to be on the board. Another underrated use for Charm is to protect your only Munkidori with Dark from Scream Tail.
- Mew can copy Scream Tail for tons of damage. This is generally best for closing out the game because Mew is a liability and all the Energy can get stuck on it. Watch out for your opponent doing this to you and try to play around it.
- Counter Catcher can be useful for KO'ing a big two-prize Pokemon such as Gardevoir or something with a Charm. Even if you are the initial aggressor, sometimes the prize trade flips back depending on the Munkidori situation. Activating your opponent's Counter Catcher is generally fine since being ahead in the prize trade is better. But don't activate it unnecessarily in the mid-game if there's potential for a big punish such as instantly losing to them KO'ing Gardevoir.
Charizard / Secret Box - Unfavorable
- Early Frillish/Jellicent can be strong, but don't use Jellicent if they already have Charmeleon in play.
- Diancie is a useful attacker, especially when there are no two-prize liabilities on your bench. You can use it to attack without Gardevoir if you preload it and/or manual attach to it. With a Charm, it even survives full power Charizard.
- If you have a fast start, Scream Tail is extremely strong for KO'ing Pidgeotto or Charmeleon, or for smacking their Pidgeot. If you have an opportunity to keep Pidgeot off the board, that is very important!
- Endgame prize trades usually revolve around attacking Mew ex, which sometimes needs to be preloaded.
- If you're too far behind, try setting up for a Devo play. It doesn't have to be a full board wipe, but at least try to get rid of the Pidgeot and a Charizard, and then Mew can finish their remaining Charizard.
- Many options such as Mind Bend, Iono, and Diancie are much stronger when they do not have Pidgeot on the board.
- Manually attaching to threats such as Diancie, Mew, and even Munkidori can be very useful as they will KO Gardevoir aggressively.
- Devo is often best used with Jellicent if possible.
Charizard / Noctowl - Very Unfavorable
- Choose to go first!
- Turn 2 Jellicent is generally bait if they have Terapagos in play. They can use Boss and pop off with Noctowl if their setup is decent. Early Frillish is the way to go. Attacking with Jellicent can be good if they don't have access to Tera Pokemon.
- Keep Frillish unevolved until you have a relevant reason to use Jellicent.
- If they do not get an early Charmeleon, double Frillish with double Munkidori can apply a lot of pressure to their board.
- If they have Charmeleon but no other Charmander, use Scream Tail to KO it. Scream Tail is a generally good attacker.
- Devo is only good if you can entirely wipe out all Charmander lines from the board OR if they are out of Boss's Orders (since Devo Jellicent stops Charizard from coming back into play). If you can do that, it's extremely strong. Charizard is an enormous threat.
- Mega Diancie with Bravery Charm can survive a max power Charizard.
- Always consider pre-loading Pokemon on your Gardevoir turns, as Gardevoir tends to disappear against Charizard.
Absol - Even or Slightly Favorable
- Item lock is extremely strong before they get their Basics out, otherwise basically useless.
- Scream Tail is usually the best attacker. Be very careful managing Scream Tail's HP and pay attention to their board state with Energy. The main thing you're trying to avoid is allowing them to KO Scream Tail with Adrenabrain and attack with Absol in the same turn. You want to open aggression by smacking their benched Absol with Scream Tail, which inevitably allows them to use Adrenabrain. Scream Tail is also the optimal attacker even into the mid- and late-game, as it allows you to pressure the most relevant Pokemon and stay on a convenient prize map.
- Sometimes you want to keep their Lively Stadium in play. It allows some relevant breakpoints and lets you do more damage with Scream Tail. Usually you only bump their Stadium when you need the relevant damage or Stadium use. You have control over when the Lively gets bumped and can utilize that HP.
- If they start attacking with Absol before you are set up, Mew ex can one-shot it by copying Terminal Period if they don't have Mist attached. If you can't get this play, just smack into the Absol for a lot of damage. In general, getting the Mew one-shot on Absol is very strong and you should do it if possible, but it doesn't line up very often.
- Diancie can be a good attacker if you're not leaving damage on their board or if they're short on Energy. Otherwise, be very careful not to let the Diancie get hit by Terminal Period. Most of the time, Diancie shouldn't be in play, especially in the early-game.
- Mind Bend is strong if they are boardlocked out of Pecharunt and only have one attacker (that doesn't have Mist), which does come up every so often.
- Save the Turo in case of Yveltal's Clutch.
- For the most part, use Charm exclusively on Scream Tail, as it allows extra damage and keeps it out of Adrenabrain range.
- Keeping damage around on the board can be very relevant in this matchup for when you want to reach with Adrenabrain.
Grimmsnarl - Slightly Unfavorable
- Devo is extremely important. It can be used either as a board wipe or tempo if they used Candy on their Grimmsnarl.
- KO any Morgrem with Scream Tail on sight.
- Try to keep Scream Tail out of range of Grimmsnarl snipe. This can be done with Charm or by being careful.
- Get as many Munkidori with Darks as possible
- Frillish is low priority, but can be good on Turn 1 if they whiffed everything.
- Manual Mind Bend is a good response to a fast aggressive Grimmsnarl.
- If they have one Froslass in play, double Munki plus Diancie one-shots Grimmsnarl.
- Avoid activating Counter Catcher if you have Gardevoir in play, unless they have a slow start and you can get the jump on them with Scream Tail.
- Watch out for their Devo play.
- Plan ahead for if they Boss KO Gardevoir and have some sort of follow up or backup plan.
Personal thoughts
This deck is obviously insanely good. It just has an unfortunate weakness to Charizard, though it is reasonable into the rest of the field and notably has a good Gholdengo matchup. I strongly prefer the TM Evo build with 3-2-2 Gardevoir as opposed to the other one, as the difference in the Dragapult matchup is massive. Having three Ralts also helps avoid lots of awkward situations and the presence of TM:Evo improves consistency. I would definitely consider playing this deck despite its bad Charizard matchup.